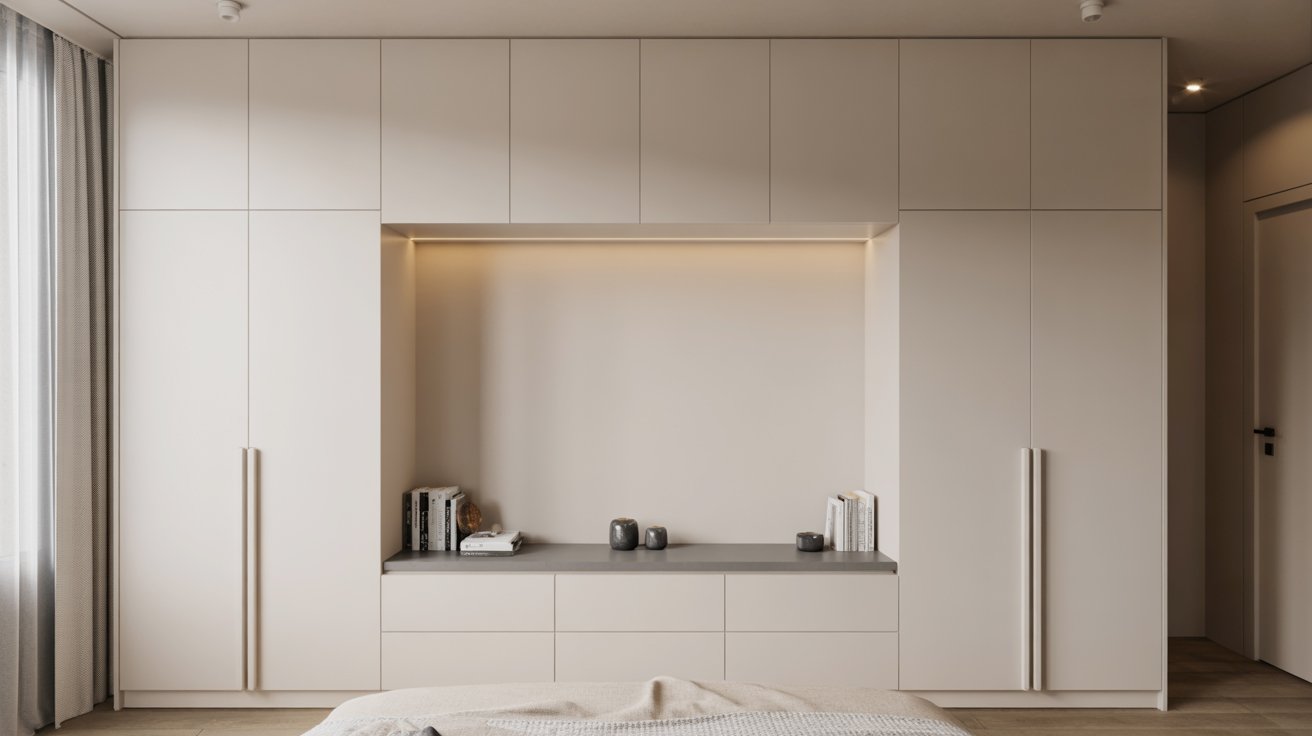
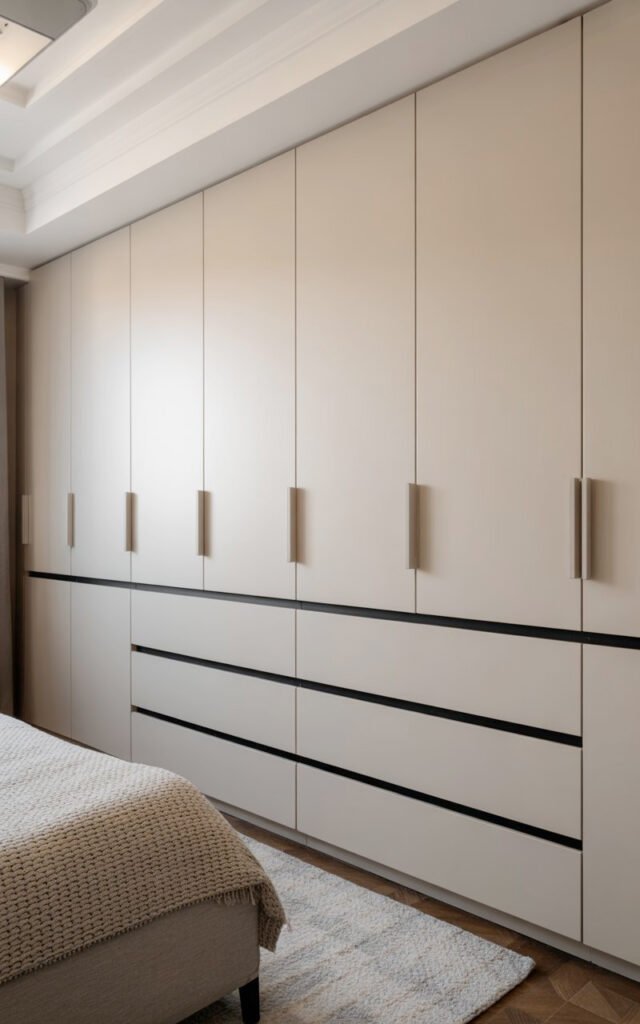
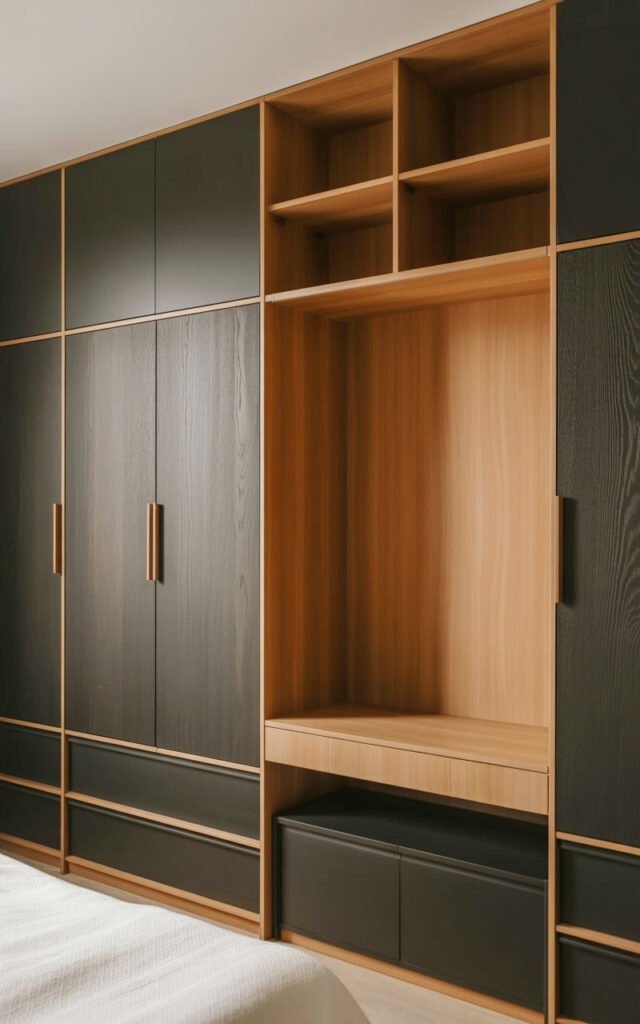
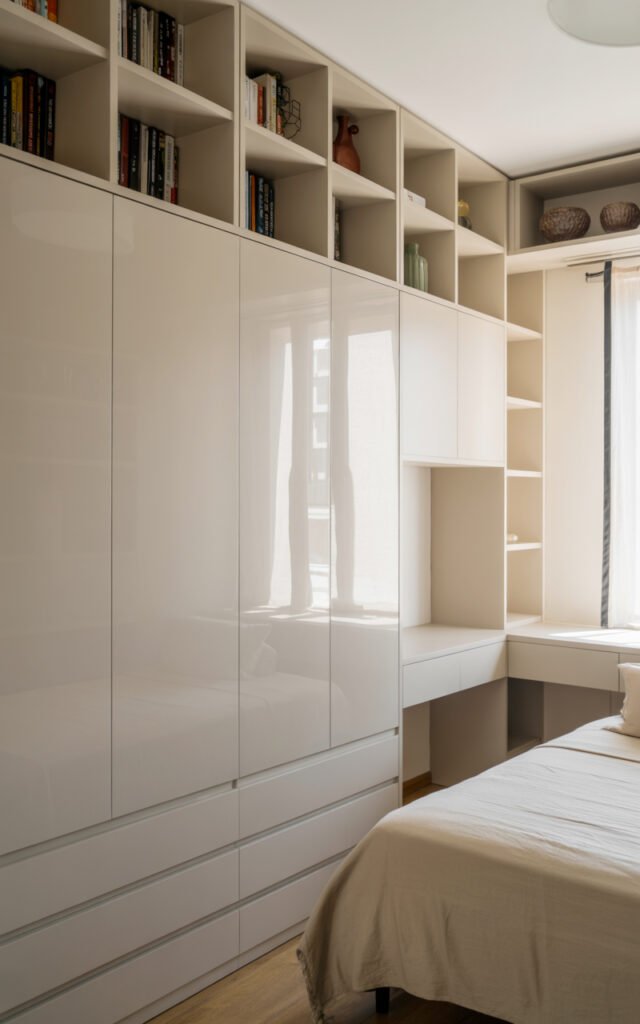
That wall of built-in furniture in the image? It looks like a million-dollar custom design, but the principles behind it – clean lines, integrated storage, LED lighting – are actually achievable at various price points. This is built in furniture bedroom design done right: seamless, functional, and sophisticated.
Let me show you how to create custom-looking bedroom design closet and storage solutions that make your space feel like a luxury hotel suite, whether you’re doing full custom work or clever IKEA hacks.
The Built-In Advantage
Built in furniture bedroom solutions solve problems that standalone furniture can’t.
Why built-ins work:
- Use every inch of vertical space (floor to ceiling)
- Create seamless, custom look
- Eliminate dead space and gaps
- Provide more storage than freestanding pieces
- Can hide irregular walls or awkward spaces
- Increase home value
- Look expensive even when they’re not
Built-in challenges:
- More expensive upfront than standalone furniture
- Permanent (can’t take with you)
- Requires planning and precision
- Not renter-friendly (usually)
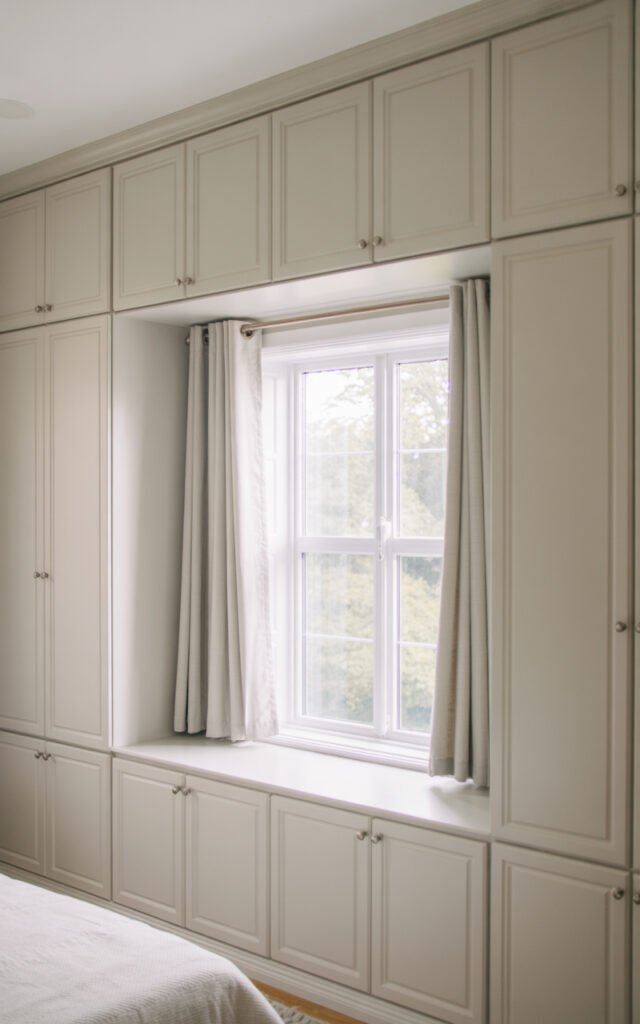
The image shows full wall built-ins with integrated lighting, hidden drawer storage, and a cohesive design that makes the room feel like one custom piece rather than separate furniture.
Bedroom Interior White: The Clean Palette
Bedroom interior white creates the perfect backdrop for built-in furniture because it makes everything feel seamless.
Why white works for built-ins:
- Makes built-ins disappear into walls
- Creates clean, uncluttered aesthetic
- Makes rooms feel larger
- Shows off lighting effects (like that LED strip)
- Timeless and resale-friendly
- Works with any accent colors
Types of white for built-ins:
- Pure white (modern, crisp)
- Warm white (softer, less stark)
- Off-white/cream (traditional, cozy)
- Match exactly to walls (disappearing effect)
The image uses white that matches or nearly matches the walls, creating that seamless custom millwork look where the built-ins feel like part of the architecture.
Built In Dressing Table In Bedroom: The Integrated Approach
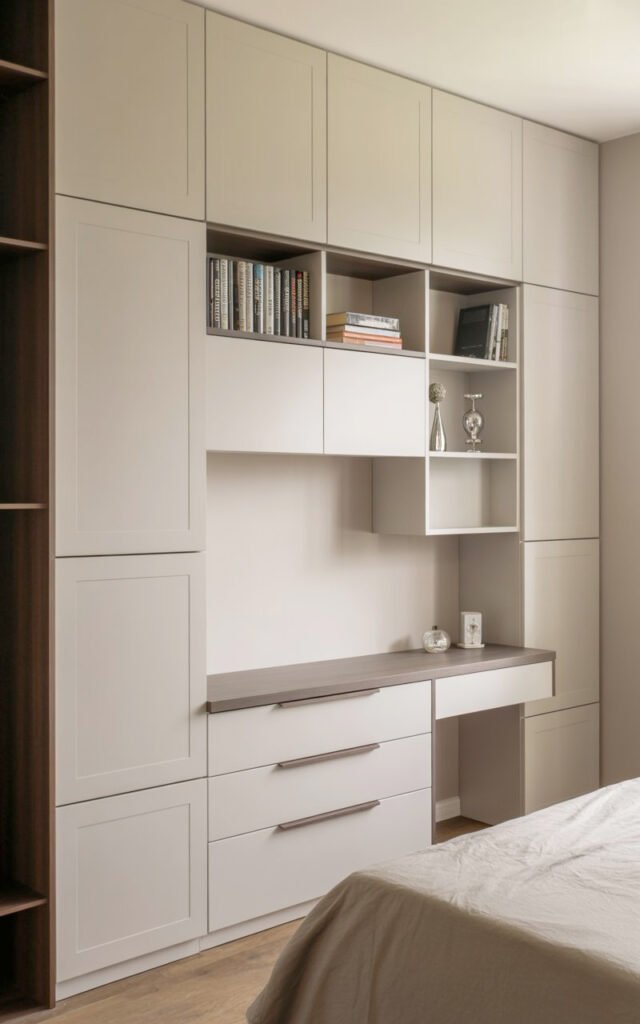
That floating counter area in the image? It’s essentially a built in dressing table in bedroom setup – integrated into the storage wall rather than a separate piece.
Integrated dressing table benefits:
- Saves floor space
- Creates continuous look
- Can be any length you need
- Storage underneath (drawers)
- Can include lighting above
- More surface area than standalone vanity
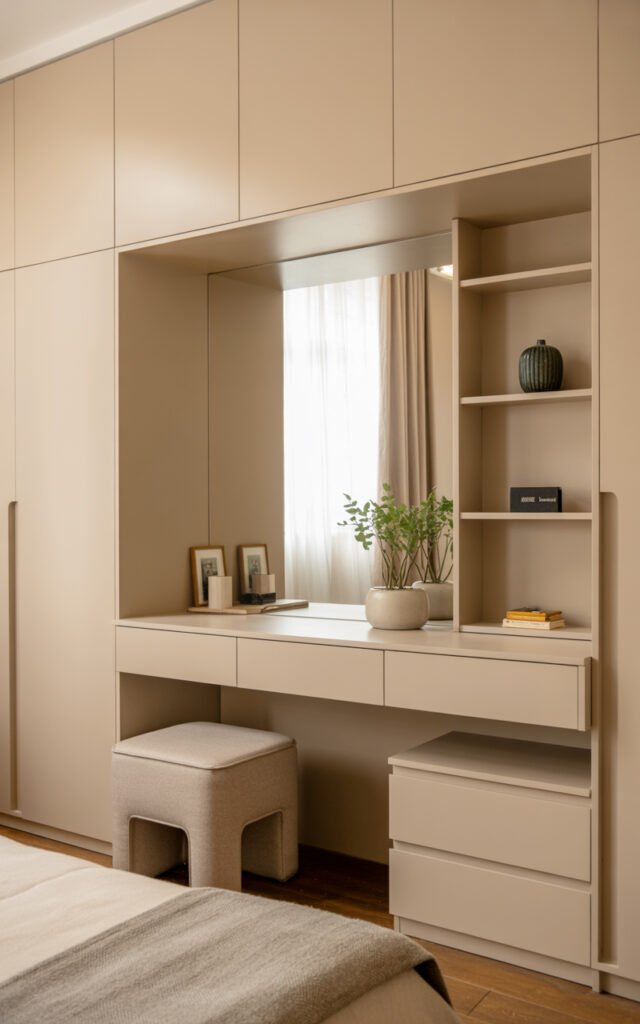
Design considerations:
- Height: 28-30 inches for comfortable seating
- Width: Minimum 36 inches, ideally 48-60 inches
- Depth: 18-20 inches (less than standard desk)
- Include electrical outlet for styling tools
- Plan for mirror (wall-mounted or integrated)
I’ve seen people create these by extending built-in closets to include a vanity section, and it looks so much more intentional than random furniture pieces.
Bedroom Design Closet: Beyond The Basic Wardrobe
Bedroom design closet integration means thinking beyond a simple closet door.
Modern closet design approaches:
- Floor-to-ceiling built-ins (like image)
- Hidden sliding doors (seamless when closed)
- Open closet integrated into wall system
- Mix of open shelving and closed storage
- Glass doors (display nice items)
Closet functionality:
- Double-hang rods (maximize vertical space)
- Drawer units integrated
- Shoe storage built-in
- Accessory organization
- Full-length mirror included
The image shows what appears to be floor-to-ceiling storage with integrated drawers and possibly wardrobe space behind those smooth panel doors – everything you need without looking like traditional furniture.
Drawer Closet: Maximizing Storage
Drawer closet combinations are more functional than hanging-only closets.
Why drawers matter:
- Store folded clothes efficiently
- Keep accessories organized
- Easier to see contents than shelves
- Prevent clothing piles
- Can be custom-sized for your needs
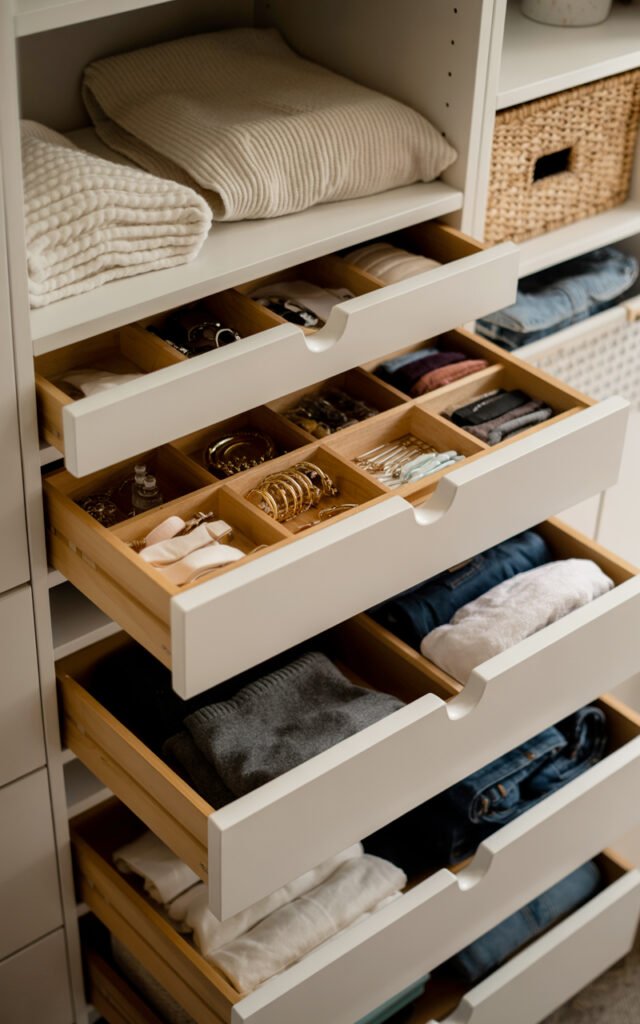
Drawer configuration:
- Shallow drawers (3-4 inches) for accessories, underwear
- Medium drawers (6-8 inches) for t-shirts, pajamas
- Deep drawers (10-12 inches) for jeans, sweaters
- Mix sizes for versatility
The built-in drawers in the image look like they’re varying heights – smart design that accommodates different storage needs.
Room For Clothes Ideas: Integrated Solutions
Room for clothes ideas go beyond traditional closets when you have built-in systems.
Maximizing clothes storage:
- Floor-to-ceiling hanging space
- Double-hang where possible (shirts above, pants below)
- Pull-out hanging rods
- Built-in shelving for folded items
- Drawer systems for small items
- Shoe cubbies or racks
Organization strategies:
- Organize by type (all shirts together)
- Color code within categories
- Seasonal rotation (front vs. back)
- Most-used items at eye level
- Formal/special occasion higher up
With built-ins, you can customize every inch to your actual wardrobe needs instead of making your clothes fit standard furniture.
Cabinet Around Window: Using Awkward Spaces
Cabinet around window installations (visible on the left of the image with those curtains) turn wasted space into functional storage.
Window wall built-in benefits:
- Frames window beautifully
- Uses otherwise dead space beside windows
- Creates window seat opportunity
- Provides storage without blocking light
- Makes window feel more architectural
Design considerations:
- Leave adequate space for curtain or blind operation
- Ensure cabinets don’t block window opening
- Consider depth (shallow cabinets don’t protrude much)
- Plan for natural light affecting contents
- Include window seat cushion if creating seating
I’ve seen window walls with built-in seating and storage underneath, and they completely transform a room’s functionality and aesthetic.
Built In Furniture Bedroom: Planning The Layout
Built in furniture bedroom planning requires thinking about the whole room, not individual pieces.
Room layout with built-ins:
- One wall of built-ins (like image)
- L-shaped built-ins (corner solutions)
- Built-ins flanking bed (headboard integration)
- Full room built-ins (all four walls)
What to include:
- Wardrobe/hanging space
- Drawer storage
- Open shelving (display and access)
- Dressing table/desk area
- TV integration if wanted
- Bedside table alternative
The image shows one long wall of built-ins with integrated everything – it’s the most common and effective approach for rectangular bedrooms.
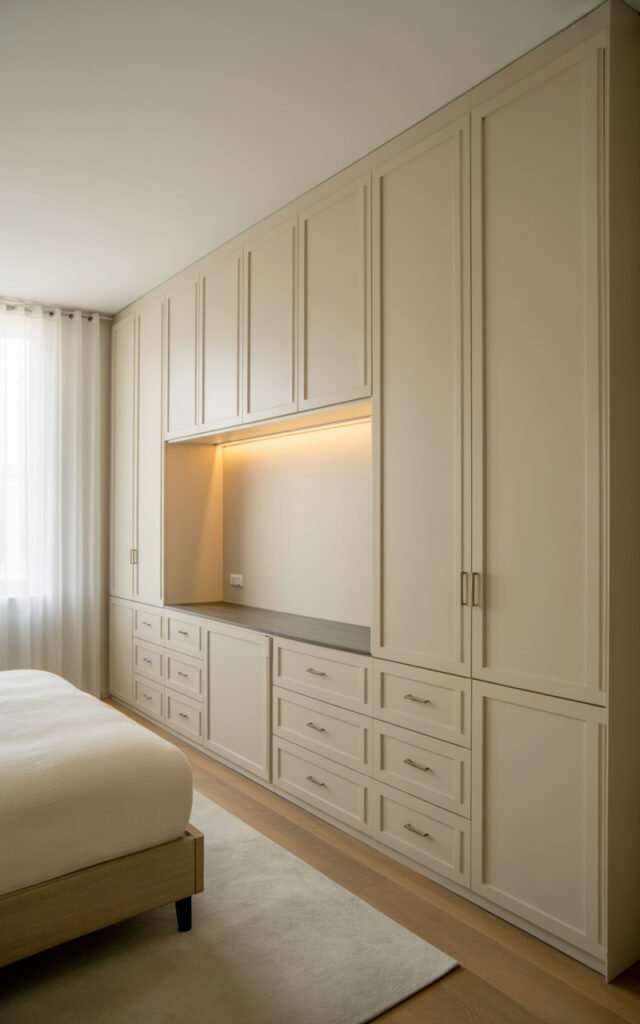
LED Lighting Integration
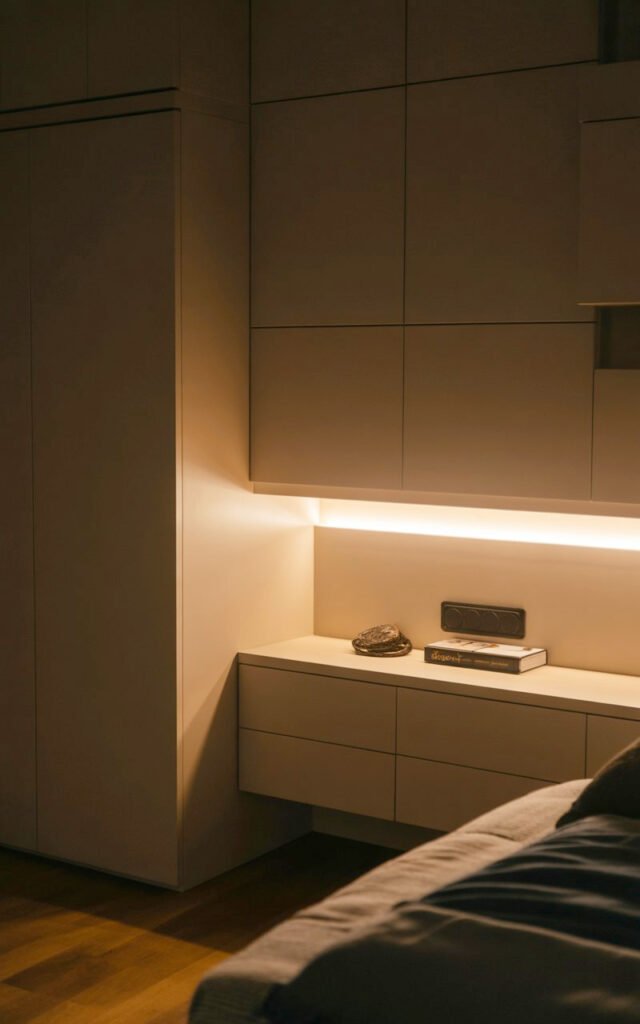
That subtle LED strip lighting in the image? That’s what elevates this from nice to luxurious.
LED lighting in built-ins:
- Under-counter lighting (like image shows)
- Inside glass-front cabinets
- Toe-kick lighting at floor
- Behind floating sections
- In hanging sections of closets
Why integrated lighting matters:
- Makes finding things easier
- Creates ambiance
- Highlights design features
- Makes space feel more expensive
- Practical for getting dressed
Technical considerations:
- Plan electrical before building
- Use warm white (2700-3000K) for bedrooms
- Include dimmers
- Consider smart controls
- Hide transformers and wiring
I added LED strips under my floating shelves for $30, and the difference in how expensive everything looks is shocking.
Bed Side Ideas: Integrated Nightstands
Bed side ideas can be integrated into built-in systems instead of freestanding nightstands.
Built-in bedside solutions:
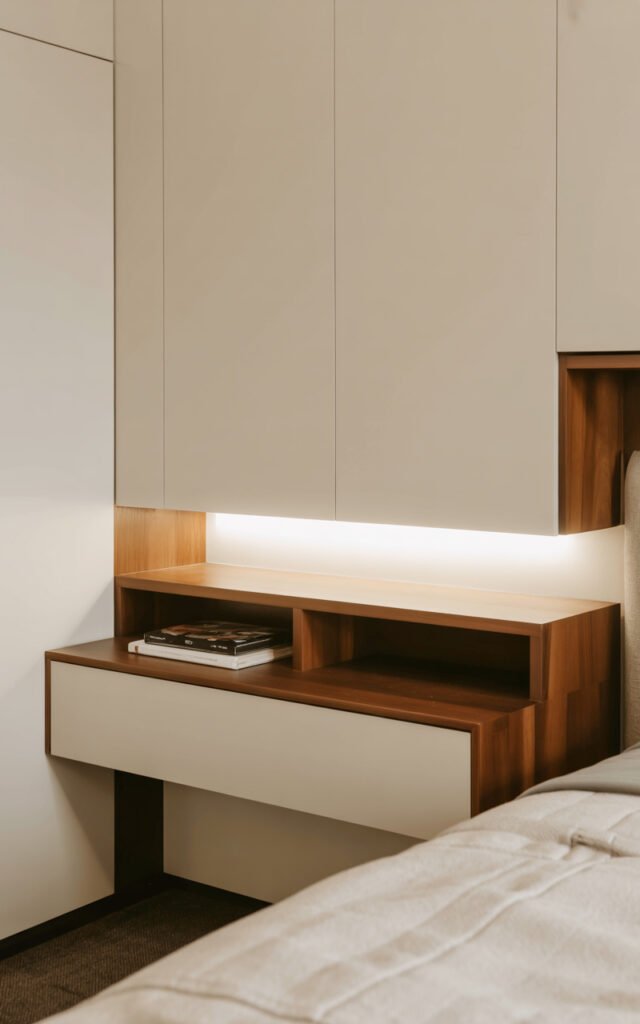
- Floating shelf extending from wall unit
- Built-in cabinet with top surface
- Extended dresser serving as nightstand
- Wall-mounted shelf with drawer below
- Recessed niche in wall
Bedside requirements:
- Surface for lamp, phone, water
- Drawer or shelf for storage
- Electrical outlet accessible
- 24-30 inches wide ideal
- 24-28 inches high (level with mattress top)
The built-in in the image could easily extend to serve as a bedside surface – that continuity makes rooms feel cohesive.
Bed With Dresser: The Integrated Approach
Bed with dresser doesn’t mean a matched bedroom set – it means thoughtfully planned storage near your bed.
Dresser placement options:
- Opposite wall (like image)
- Flanking bed
- Foot of bed (low profile)
- Integrated into bed platform
Built-in dresser benefits:
- Custom size for your space
- Floor-to-ceiling option
- Integrated with closet system
- Can include counter space for dressing
- Seamless aesthetic
With built-ins, your “dresser” is just part of the wall system – no separating pieces, no gaps, no trying to match finishes years later.
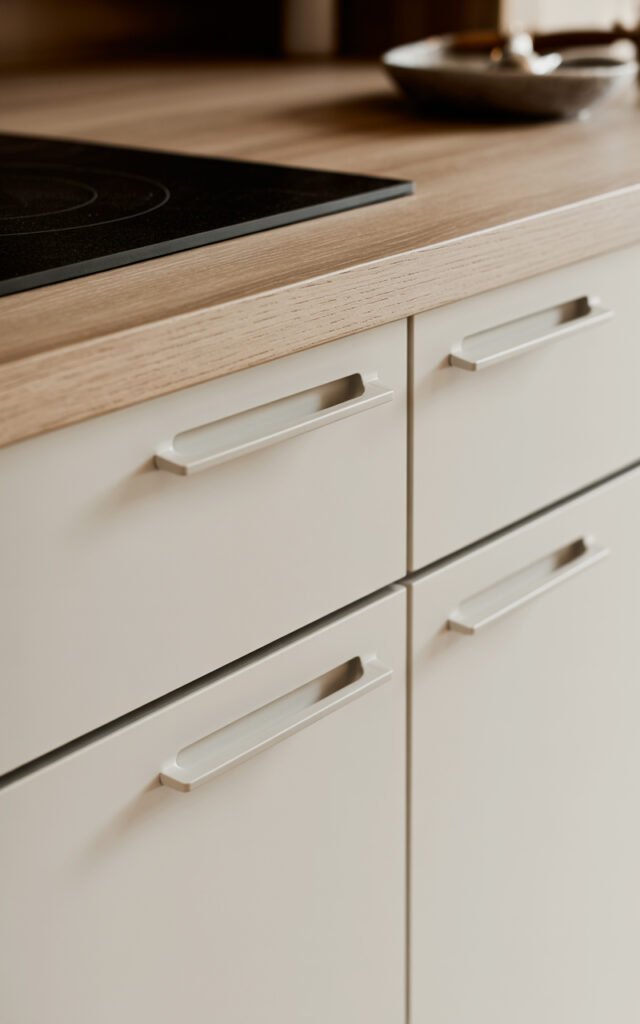
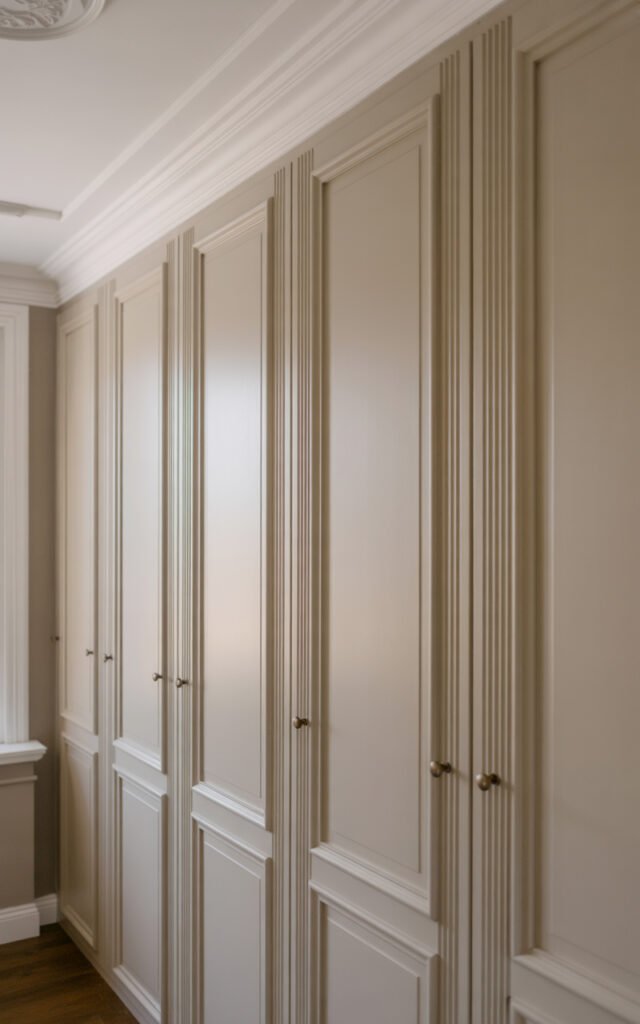
The Handleless Design
Notice the image has no visible handles? That’s a key modern built-in design feature.
Handleless options:
- Push-to-open mechanisms
- Recessed finger pulls (like image seems to have)
- Touch-latch systems
- Horizontal grooves
- Thin edge profiles you can grip
Why handleless works:
- Cleaner, more modern look
- Easier to clean (no hardware to dust around)
- Safer (no corners to bump into)
- Emphasizes seamless design
- Makes everything look custom
Considerations:
- Push-open needs good mechanisms (cheap ones fail)
- Finger pulls need precise cutting
- May be harder for elderly or children
- Can show fingerprints on dark colors
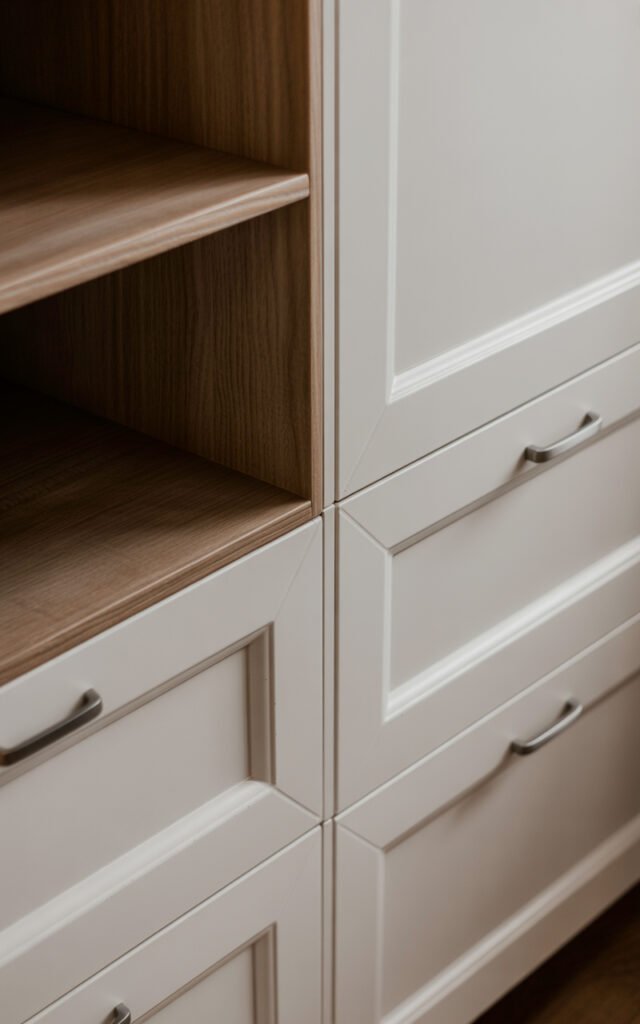
Material Choices For Built-Ins
The material choice affects both cost and appearance.
Built-in material options:
MDF (Medium Density Fiberboard):
- Pros: Smooth finish, takes paint well, affordable
- Cons: Heavy, not great if water damage risk
- Best for: Painted built-ins
Plywood:
- Pros: Strong, lighter than MDF, versatile
- Cons: More expensive, harder to get smooth finish
- Best for: Structural elements, wood finish
Laminate:
- Pros: Durable, moisture-resistant, many finishes
- Cons: Can look cheap, hard to repair
- Best for: High-use areas, modern aesthetic
Real wood:
- Pros: Beautiful, repairable, adds value
- Cons: Expensive, can warp
- Best for: High-end projects, traditional styles
The image likely uses painted MDF or high-quality laminate – both create that smooth, seamless look when done well.
DIY Vs. Professional Built-Ins
DIY approach:
- IKEA PAX or PLATSA systems (modular built-ins)
- Custom fronts for IKEA frames
- Basic carpentry with MDF and paint
- Cost: $1,000-3,000 for a wall
Semi-custom approach:
- Closet companies (California Closets, etc.)
- Local carpenter with standard materials
- Modular systems customized for space
- Cost: $3,000-8,000 for a wall
Fully custom approach:
- Architect or designer design
- Custom cabinetmaker build
- High-end materials and finishes
- Cost: $8,000-20,000+ for a wall
The look in the image is achievable at any price point – the key is good planning and clean execution.
IKEA PAX Hack: Budget Built-Ins
The most popular DIY built-in is the IKEA PAX hack – making modular wardrobes look custom.
IKEA PAX to built-in transformation:
- Buy PAX frames and doors
- Mount floor-to-ceiling (add crown molding)
- Add custom or IKEA drawer inserts
- Paint or add custom fronts
- Install LED lighting
- Add baseboards and trim
- Result: Looks custom, costs fraction
Cost breakdown:
- PAX frames and doors: $1,000-2,000
- Custom fronts or paint: $300-600
- LED lighting: $100-200
- Trim and finishing: $200-400
- Total: $1,600-3,200 for full wall
I’ve done this and it’s genuinely impressive how custom it looks when finished properly.
Color And Finish Considerations
The all-white in the image is safe and timeless, but you have options.
Finish options:
- All white (like image – clean, seamless)
- Two-tone (darker base, lighter top)
- Wood tone (warm, natural)
- Bold color (accent wall effect)
- Mix of open and closed (visual variety)
Choosing the right finish:
- Match walls for seamless (image approach)
- Contrast walls for definition
- Consider lighting (dark shows dust)
- Think long-term (resale value)
- Match existing trim and doors
Small Bedroom Built-In Solutions
Built-ins are especially valuable in small bedrooms where every inch counts.
Small room built-in strategies:
- One wall, floor-to-ceiling
- Around bed (flanking and overhead)
- Around window with seating
- Corner units (L-shaped)
- Over doorway (if high ceilings)
Maximizing small spaces:
- Go vertical (use height)
- Mix open and closed (prevents heaviness)
- Include multi-function areas (dresser as desk)
- Keep finishes light (doesn’t overwhelm)
- Integrate lighting (makes it feel bigger)
Maintenance And Organization
Built-ins are only as good as how you maintain them.
Keeping built-ins organized:
- Use drawer dividers
- Label shelves and containers
- Implement organization system
- Regular decluttering (seasonal)
- Don’t overstuff drawers
Maintenance:
- Wipe down surfaces weekly
- Clean tracks and mechanisms
- Touch up paint as needed
- Check LED lights
- Tighten any loose hardware
The pristine look in the image only stays that way with regular maintenance and discipline about what you store and how.
Adding Built-Ins To Existing Rooms
If you’re adding built-ins to an existing bedroom:
Planning steps:
- Measure precisely (walls may not be straight)
- Check for outlets and switches
- Consider window and door clearances
- Plan electrical for lighting
- Decide on permanent or removable
Installation considerations:
- May need to remove baseboards
- Electrical work might require permit
- Ensure level installation
- Consider wall studs for mounting
- Plan for trim and finishing
The Final Build
Creating beautiful built in furniture bedroom solutions comes down to planning for your actual storage needs, using vertical space fully floor-to-ceiling, integrating LED lighting for luxury feel, choosing handleless or minimal hardware, and maintaining seamless white or neutral finish.
That’s it. Five principles that work whether you’re spending $2,000 on IKEA hacks or $20,000 on custom millwork.
The image shows that built-ins aren’t just about storage – they’re about creating architecture where none existed, making a room feel custom and considered rather than just furnished.
Your bedroom can have that seamless, expensive hotel suite look. It just requires planning the whole wall as one system rather than buying individual furniture pieces.
Now go measure your walls and start planning. Your cluttered dresser and mismatched nightstands don’t have to be forever. 🙂