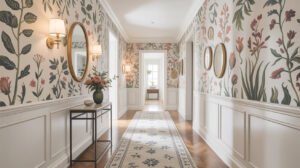
I’ll never forget the first time I walked into a friend’s renovated home and was stopped in my tracks by their entryway. It wasn’t grand or massive—actually, it was pretty standard-sized. But that backlit sculptural mirror, the floating console, the carefully curated styling? It felt like stepping into a five-star hotel lobby. I literally stood there wondering how much it cost to hire their designer.
Plot twist: They did it themselves for under $1,500.
That’s when I realized that luxury house interior design isn’t about square footage or unlimited budgets. It’s about intentional choices, quality over quantity, and understanding what creates that “wow” factor the moment someone walks through your door.
If you’re tired of your entryway feeling like an afterthought—or worse, looking like a basic builder-grade space—let me show you how to create that luxury aesthetic without the luxury price tag.
Understanding Luxury Entryway Design
Before we start shopping for statement pieces, let’s talk about what actually makes an entryway feel luxurious rather than just expensive-looking.
The Elements of Luxury Design
Quality materials: Real or high-quality faux materials that look and feel substantial.
Intentional lighting: Layered, warm, dramatic—never just one overhead bulb.
Statement pieces: One or two showstoppers rather than lots of small items.
Negative space: Luxury design breathes. It’s not cluttered or over-styled.
Cohesive palette: Limited, sophisticated color scheme.
Attention to detail: Everything from hardware to styling feels considered.
Functionality meets beauty: Gorgeous but also works for daily life.
What Luxury Doesn’t Mean
Not cluttered: More stuff ≠ more luxury. Often the opposite.
Not all expensive: Strategic splurges mixed with budget finds.
Not uncomfortable: Luxury should feel good, not like a museum you can’t touch.
Not trendy: True luxury design is timeless, not chasing every Instagram trend.
Not matchy-matchy: Collected and curated, not bought as a set.
The key to bedroom interior design luxury aesthetic (which translates perfectly to entryways) is understanding that it’s about the FEELING you create, not the price tags you hide.
The Statement Mirror: Your Luxury Focal Point
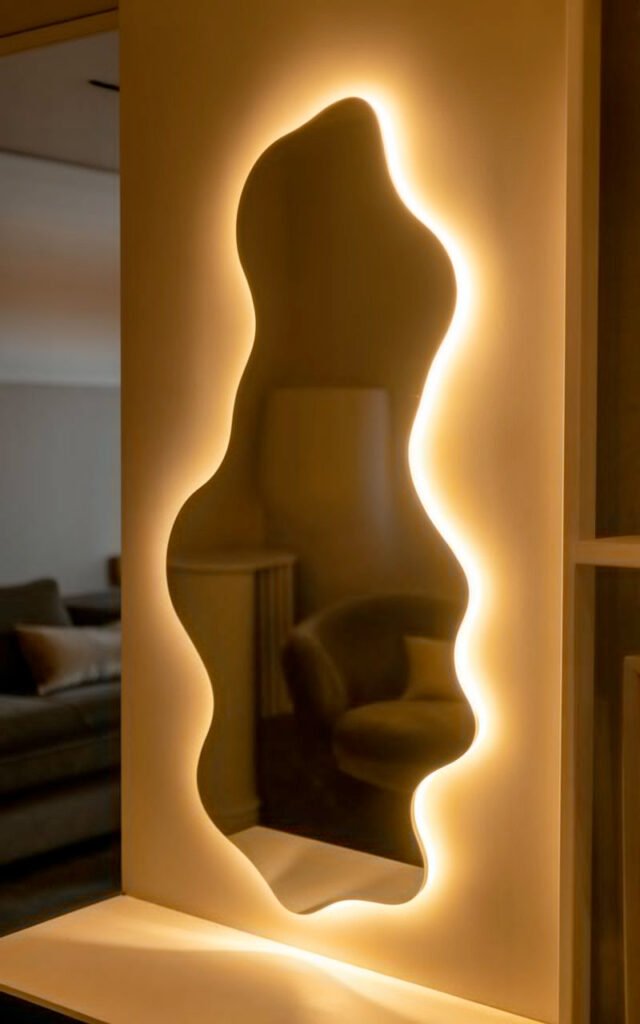
That incredible backlit sculptural mirror in the inspiration image? That’s doing about 80% of the heavy lifting in making this entryway feel special. Let’s talk about why mirrors are your secret weapon in luxury house interior design.
Why Statement Mirrors Transform Entryways
Create instant drama: A unique mirror draws the eye and sets the tone immediately.
Reflect light: Doubles the impact of your lighting and makes spaces feel larger.
Provide function: Last-minute checks before leaving are essential.
Fill vertical space: Uses wall real estate effectively.
Act as art: A sculptural mirror IS your artwork—no need for additional pieces.
Make small spaces feel larger: Essential in compact entryways.
Types of Statement Mirrors
Backlit mirrors (like the inspo):
What it is: LED lighting integrated behind or around the mirror, creating a halo glow effect.
Why it works:
- Creates drama and dimension
- Provides ambient lighting
- Ultra-modern, contemporary
- Makes the mirror appear to float
- Instant luxury upgrade
Where to find:
- Custom made ($$$$)
- Online retailers like Wayfair, West Elm ($300-800)
- DIY with mirror + LED strips ($150-300)
Organic/sculptural shapes:
- Irregular, wavy, asymmetric (like the inspo)
- Feels artistic and custom
- Softer than geometric shapes
- Very current in high-end design
Oversized minimalist:
- Large, simple shape
- Thin or no frame
- Leans against wall or mounted
- Modern, clean luxury
Ornate/vintage:
- Detailed frame, traditional
- Works in classic luxury spaces
- Antique or antique-style
- More formal feeling
Sizing Your Statement Mirror
Height considerations:
- Should be substantial—minimum 48″ tall
- Can go floor to ceiling for drama
- The inspo mirror looks about 6-7 feet tall
- Taller = more impact in entryways
Width proportions:
- Roughly 1/2 to 2/3 the width of furniture below it
- Or stand alone without furniture
- Measure your wall space carefully
Placement:
- Center on the wall (like the inspo)
- At eye level if mounting
- Ensure it reflects something nice (not a toilet or messy room)
I spent $450 on a custom wavy-edge backlit mirror (found a local fabricator on Instagram). It’s 5 feet tall and completely transformed my basic entryway into something people stop and comment on. Best money I’ve spent on home decor.
DIY Backlit Mirror
If you’re handy:
- Purchase or cut custom shape mirror ($100-200)
- Add LED strip lights behind ($30-50)
- Mount with spacers so light escapes around edges
- Connect to dimmer switch
- Total: $150-300 vs. $600-1200 retail
Process:
- Design your mirror shape
- Have glass shop cut or buy pre-cut
- Create mounting system with standoffs
- Adhere LED strips to back
- Wire to power source
- Mount securely
Difficulty: Intermediate Time: One weekend
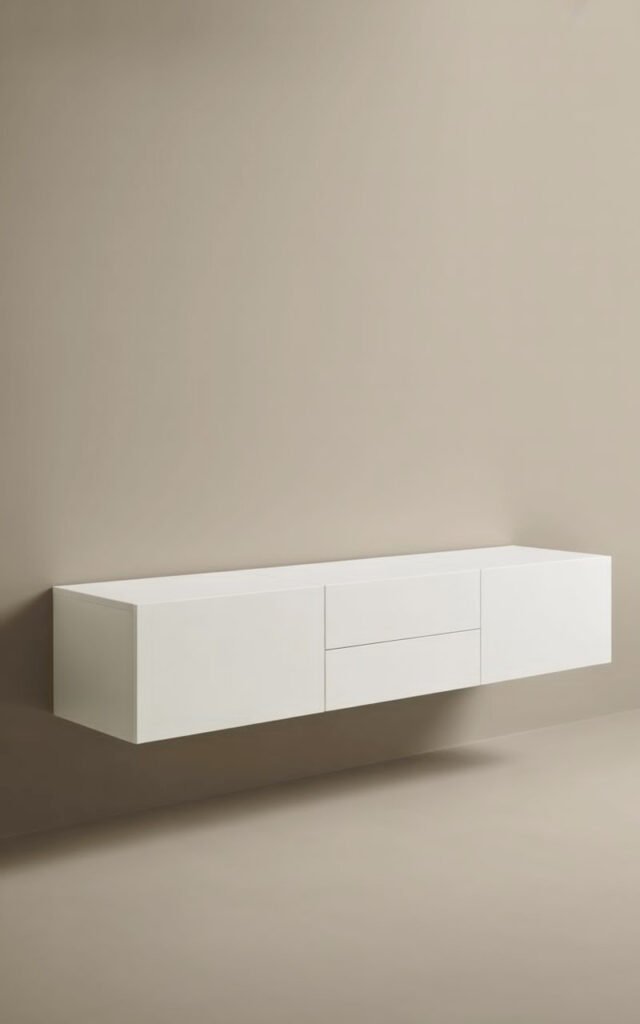
The Floating Console: Sleek Storage Solution
The floating console in the inspiration image is pure luxury design—clean, minimal, functional, and visually light. This is home hall design at its finest.
Why Floating Consoles Work in Luxury Design
Visual lightness: No legs or base touching floor makes space feel larger.
Modern aesthetic: Contemporary, clean-lined, sophisticated.
Shows off flooring: Especially important if you have beautiful tile or stone.
Creates storage without bulk: Drawers or shelves hidden inside.
Easy to clean: No furniture legs to vacuum around.
Customizable height: Mount at perfect height for your space.
Floating Console Options
Wall-mounted cabinets (like the inspo):
Style:
- Sleek, handleless drawers
- Appears to float
- Integrated or hidden hardware
- Often lacquered or wood veneer
Size considerations:
- 48-72 inches wide typical
- 12-18 inches deep
- Mounts 24-30 inches from floor usually
Where to find:
- IKEA Besta system ($200-400)—hackable
- CB2, West Elm ($400-800)
- Custom built-ins ($800-2000)
Floating shelves:
- Simpler, more affordable option
- Single or stacked
- 10-15 inches deep
- Natural wood or painted
Floating desk/console hybrid:
- If you need workspace
- Pull-out drawers or keyboard tray
- Dual function
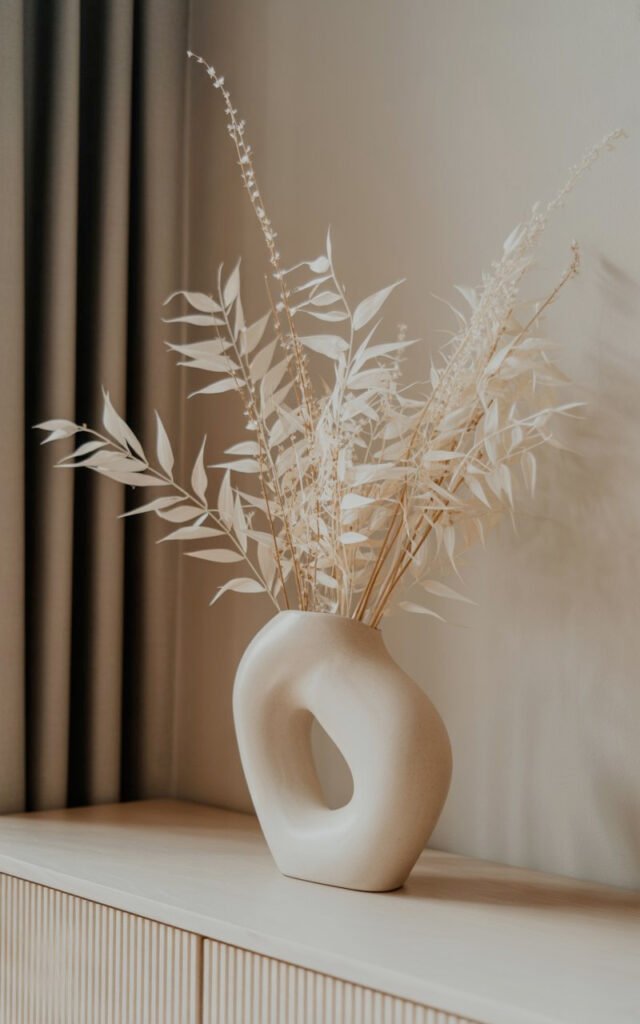
Styling Your Floating Console
The formula (like perfectly executed in the inspo):
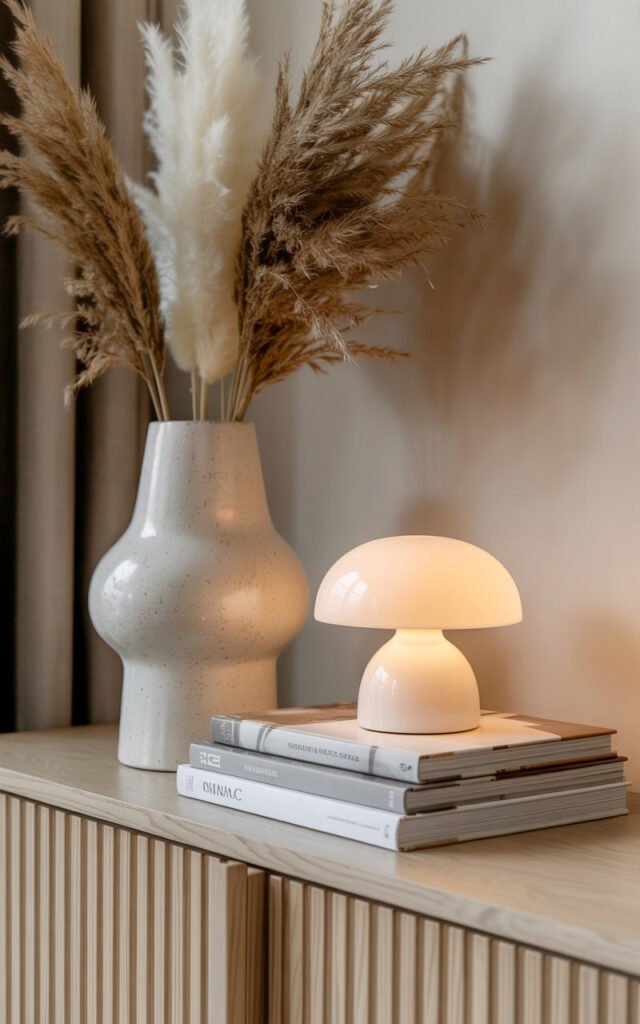
Base layer:
- Stack of decorative books (2-4)
- Provides height and interest
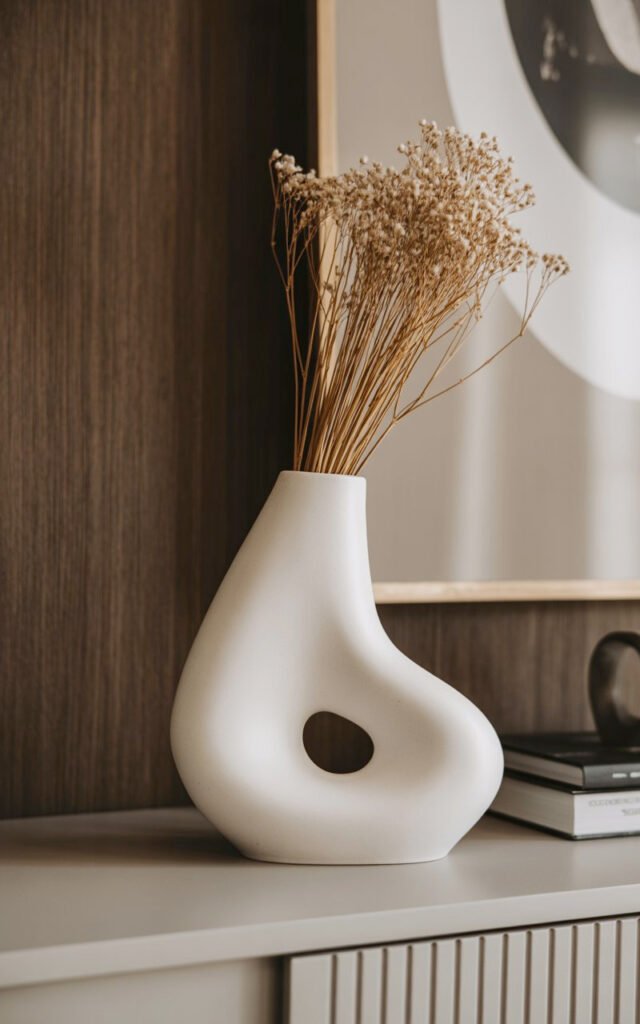
Sculptural object:
- Vase, sculpture, or decorative piece
- Organic shape preferred (like the inspo vase)
- Neutral color
Natural element:
- Dried branches, pampas, flowers
- Brings life and texture
- The inspo uses dried botanicals
Small accent:
- Candle, small object, or decorative box
- Minimal—don’t overdo it
The rule: Odd numbers (3 or 5 items), varied heights, grouped together.
Installation Tips
Find studs: Non-negotiable. These need to be VERY secure.
Weight rating: Ensure hardware can support the cabinet + items on it.
Level is critical: Use a long level. Crooked floating consoles are instantly obvious.
Hide wires: If adding a lamp or charging station, plan wire management.
Height:
- Lower than traditional console (28-32 inches)
- Should allow clearance for stool or pouf underneath if desired
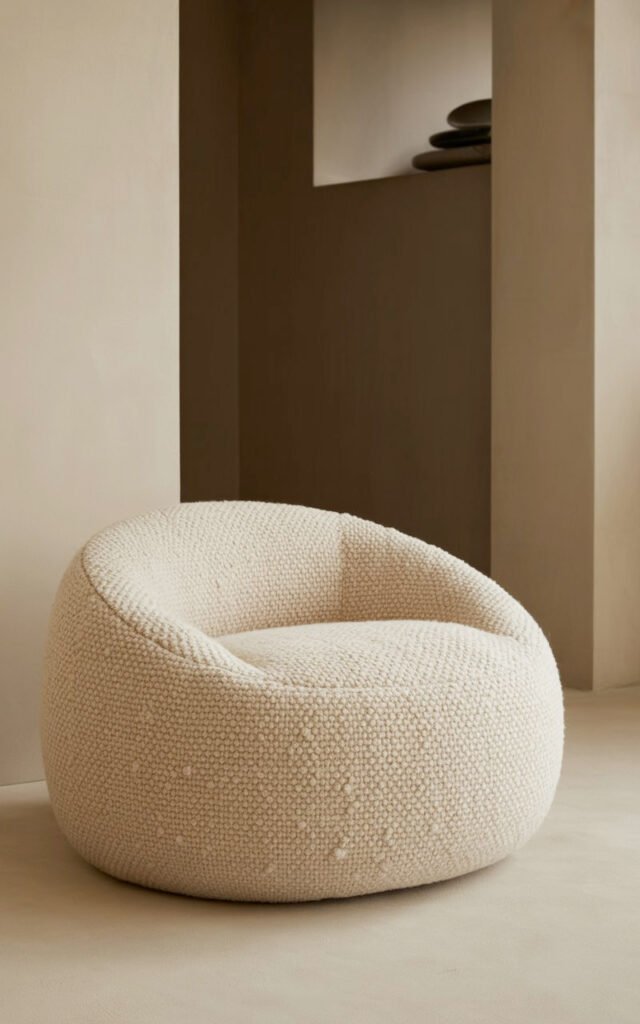
The Pouf or Ottoman: Functional Luxury
That organic-shaped, textured pouf in the inspiration image isn’t just pretty—it’s practical luxury. Let’s talk about stylish room decor through functional seating.
Why Poufs Work in Entryways
Flexible seating: Pull it out when putting on shoes, tuck it away when not needed.
Soft, organic shape: Contrasts with angular furniture and architecture.
Adds texture: Especially in neutral spaces, texture creates visual interest.
No legs to bump: Rounded edges safer than furniture with corners.
Easy to move: Lightweight, can be repositioned easily.
Fills space: Takes up dead floor space purposefully.
Choosing the Right Pouf
Size:
- 18-24 inches diameter typical
- 16-18 inches high
- Big enough to sit on, not so big it overwhelms
Shape:
- Round (most common)
- Oval (like the inspo)
- Square or rectangular
- Organic/irregular
Material and texture:
Bouclé (trendy right now):
- Textured, nubby fabric
- Cream, beige, or neutral
- Soft and touchable
- Hides wear
Linen or cotton:
- Clean, minimalist
- Can be more formal
- Shows wear more
Leather:
- Smooth or textured
- More masculine
- Durable, wipes clean
Woven natural fibers:
- Jute, seagrass, rattan
- Casual, organic
- More textural
Color selection:
- Neutrals for luxury: cream, beige, tan, taupe
- Can go tonal (match walls) or slight contrast
- Avoid bright colors—they read less luxurious
I have a cream bouclé round pouf ($150 from Article) that lives in my entryway. It’s the perfect height for putting on shoes, looks expensive, and hides the fact that my dog occasionally lies on it.
Luxury Lighting Strategies
The soft, warm lighting in the inspiration image—from the backlit mirror and that spherical lamp—is critical to the luxury feeling. Let’s master interior design your home lighting.
Layering Entryway Lighting
Ambient lighting:
- Overhead fixture (flush-mount, pendant, or chandelier)
- Provides general illumination
- Should be dimmable
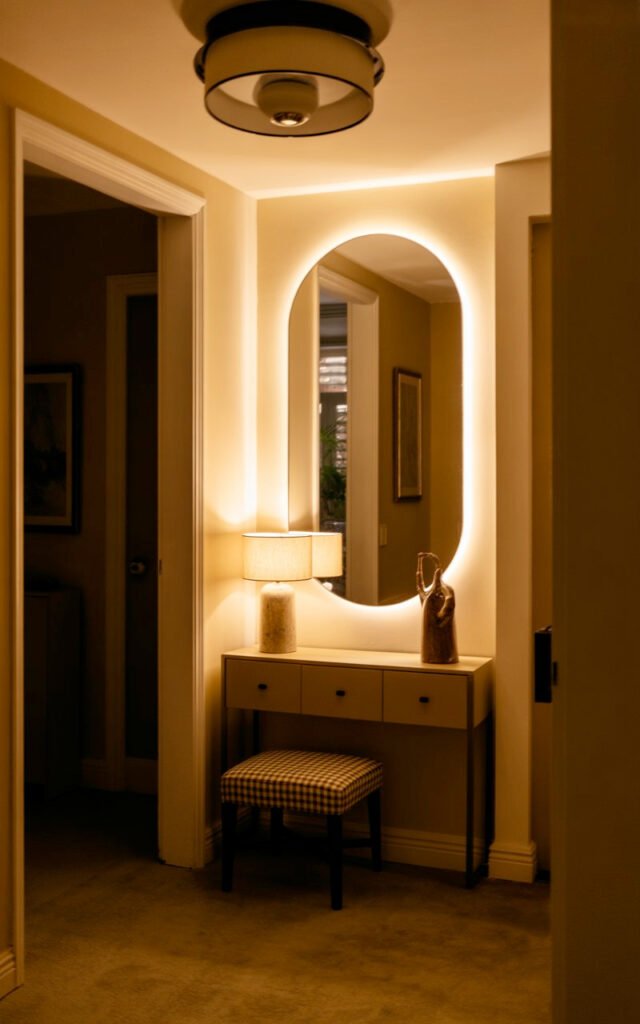
Accent lighting:
- Backlit mirror (like the inspo)
- Creates drama and glow
- Adds dimension
Task lighting:
- Table lamp on console
- For practical tasks
- Also decorative
The goal: Multiple light sources at different levels creating depth and warmth.
Light Fixture Styles for Luxury
Modern sculptural pendant:
- Geometric or organic shape
- Brushed brass, matte black, or polished chrome
- Makes a statement overhead
Flush or semi-flush ceiling mount:
- If ceiling height limited
- Choose interesting design
- Alabaster or white glass diffuses beautifully
Small chandelier:
- If you have the ceiling height
- More formal, traditional luxury
- Linear or round
Table/accent lamps:
- Sculptural ceramic or glass base
- Simple shade in white or cream
- Like the mushroom lamp in the inspo
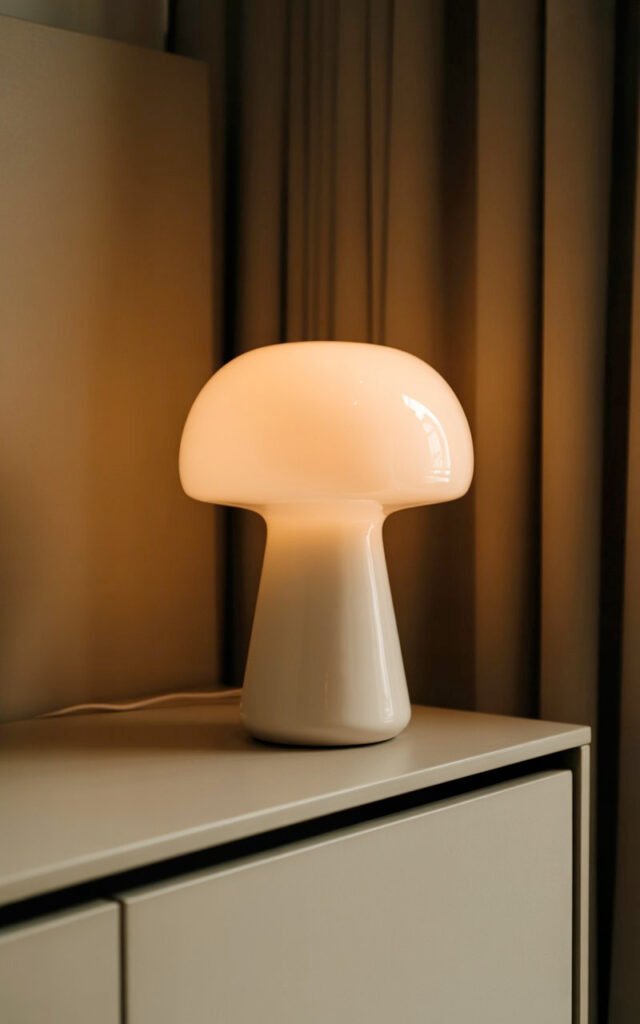
Color Temperature Matters
Warm white (2700-3000K):
- Essential for luxury residential
- Creates cozy, inviting glow
- The inspo lighting is warm
Never cool white:
- Feels commercial and harsh
- Unflattering to skin tones
- Kills the luxury vibe instantly
Dimmers:
- Absolute must-have
- Control the mood
- Bright for function, dim for ambiance
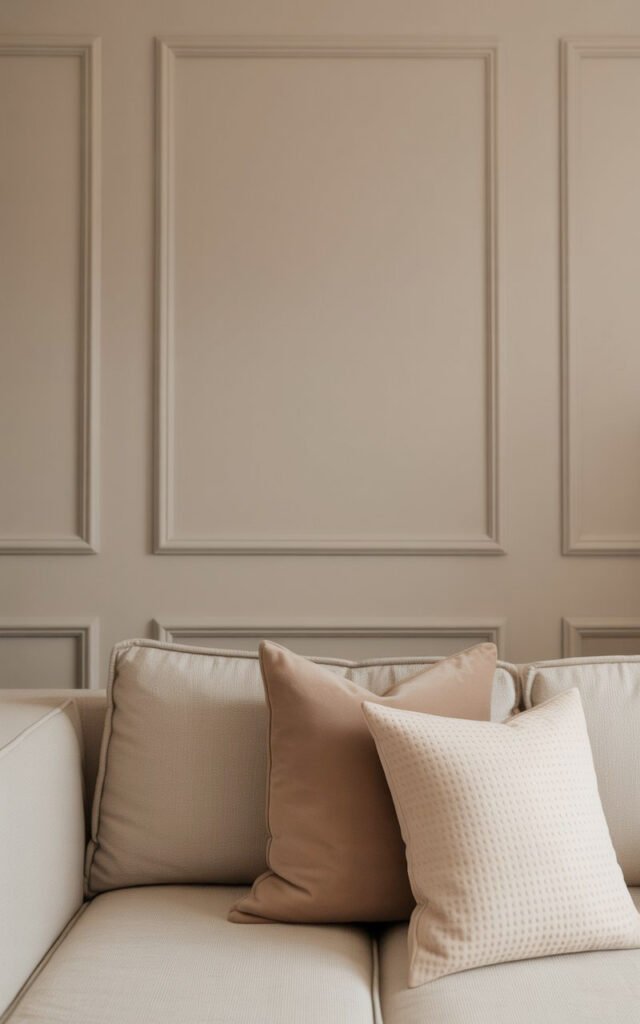
Color Palette: Neutrals Done Right
The inspiration image is a masterclass in neutral luxury—warm beiges, creams, tans, with natural wood and metallic accents. This is luxury house interior design color theory in action.
The Luxury Neutral Palette
Base colors:
- Warm white or cream walls
- Beige, tan, or warm gray
- Soft taupe or mushroom
- Sandy neutrals
Accent tones:
- Natural wood (light to medium)
- Matte black or bronze (hardware, accents)
- Warm metallics (brass, gold, bronze)
- Touch of warm gray
What makes it work:
- All warm-toned (no cool grays or stark whites)
- Layered—multiple shades of neutral
- Texture creates visual interest instead of color
- Cohesive and calm
Adding Depth Without Color
Vary your neutrals:
- Light walls, medium furniture, darker accents
- All the same shade reads flat
- Create tonal depth
Use texture:
- Smooth walls + textured pouf
- Glossy console + matte walls
- Rough natural wood + soft fabrics
Incorporate natural materials:
- Wood, stone, leather, linen, wool
- Their inherent variations add interest
Strategic metallics:
- Warm brass or bronze > cool chrome
- In hardware, fixtures, accessories
- Small doses, not overwhelming
The inspiration image has maybe 6-7 colors total, all in the neutral family, but it feels rich and layered because of the texture and material variety.
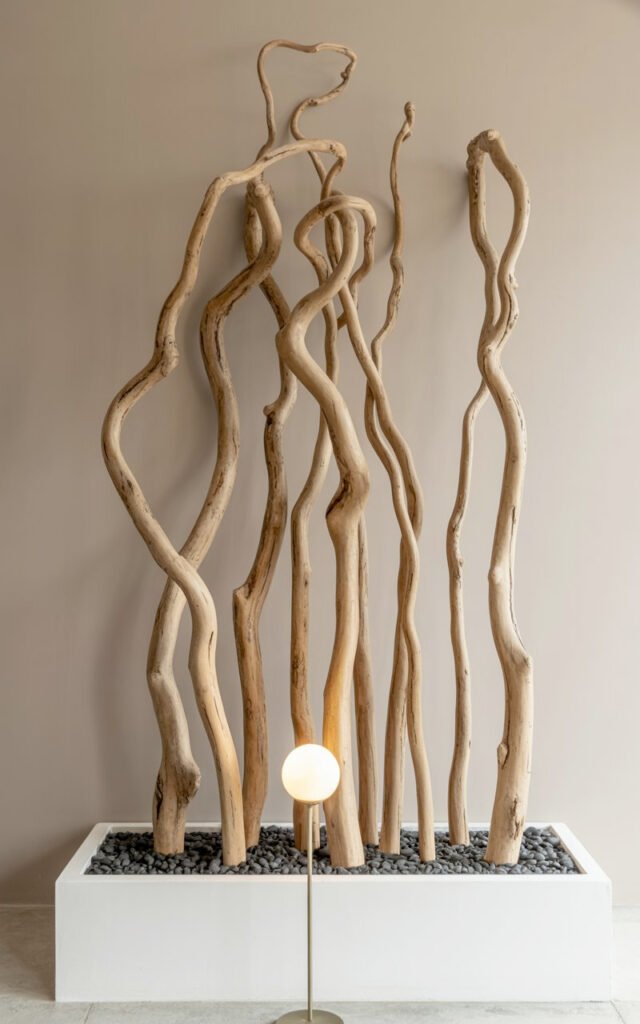
Natural Elements: Bringing Life to Luxury
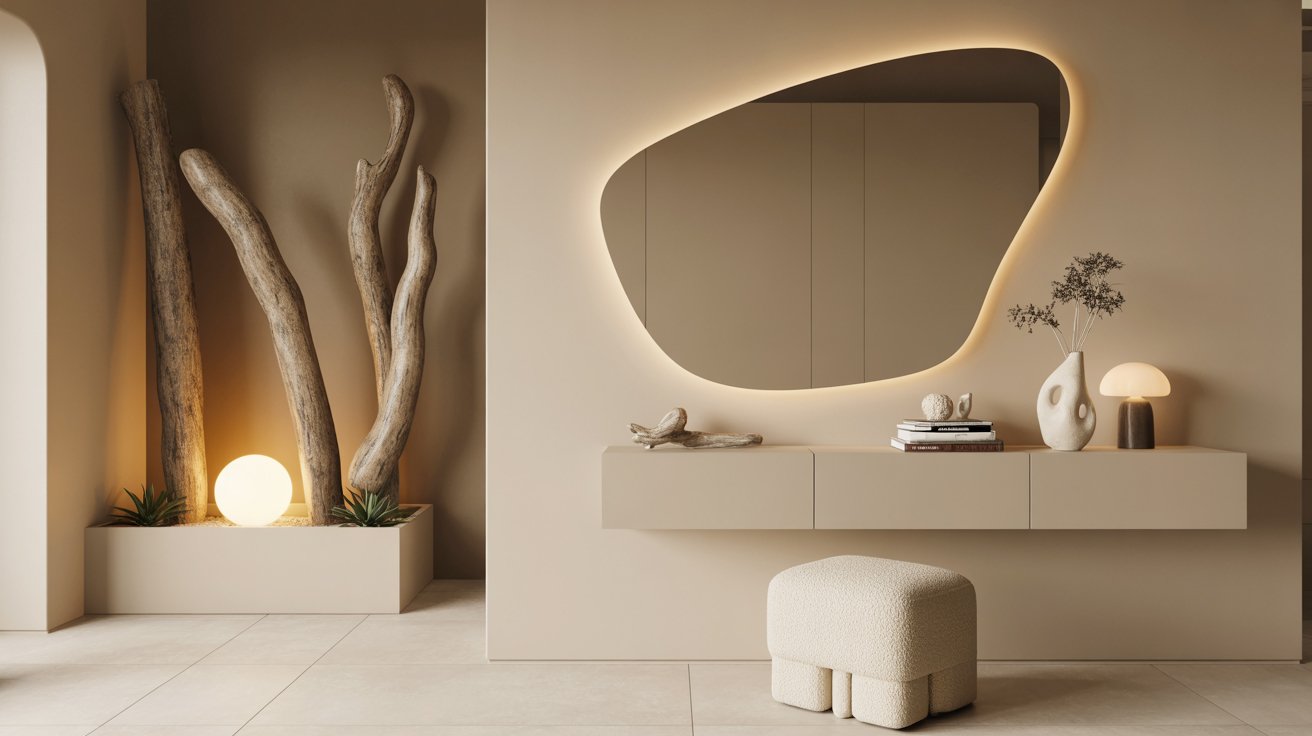
Those sculptural driftwood pieces and dried botanicals in the inspiration image? They’re not just decoration—they’re essential elements of stylish room decor that make spaces feel alive and organic.
Why Natural Elements Matter
Softens modern design: Prevents spaces from feeling too sterile or cold.
Adds organic shapes: Contrasts with geometric furniture and architecture.
Brings texture: Rough bark, delicate stems, natural imperfection.
Creates connection to nature: Biophilic design principles.
Timeless: Natural materials never go out of style.
Unique: No two pieces are exactly alike.
Types of Natural Elements
Sculptural branches (like the inspo):
What to use:
- Driftwood pieces
- Manzanita branches
- Sculptural twisted wood
- Dried branches
How to display:
- In large floor vase or planter
- Leaning against wall
- On console in shorter vessel
Where to find:
- Beach or nature walks (free!)
- Craft stores ($20-60)
- Online retailers ($40-150)
- Foraged and cleaned yourself
Dried botanicals:
- Pampas grass
- Dried palm fronds
- Bunny tails
- Lunaria
- Wheat stalks
- The inspo uses delicate dried stems
Living plants:
- Fiddle leaf fig
- Monstera
- Snake plant
- Only if you’ll maintain them
Natural stone/pebbles:
- In trays or bowls
- Zen, organic feel
- Grounding element
Styling With Natural Elements
Scale matters:
- Large spaces need substantial pieces
- The driftwood in the inspo is 5-6 feet tall
- Small spaces can use shorter, more delicate pieces
Placement:
- Floor arrangements for tall pieces
- Console for medium-sized vases
- Shelves for smaller elements
Container choices:
- Sculptural ceramic vases (like the inspo)
- Natural stone or concrete
- Simple glass
- Organic shapes preferred
I found two large pieces of driftwood on a beach trip, cleaned them, and put them in a concrete planter with black stones ($30 for planter). They’re 6 feet tall and instantly make my entryway feel collected and interesting.
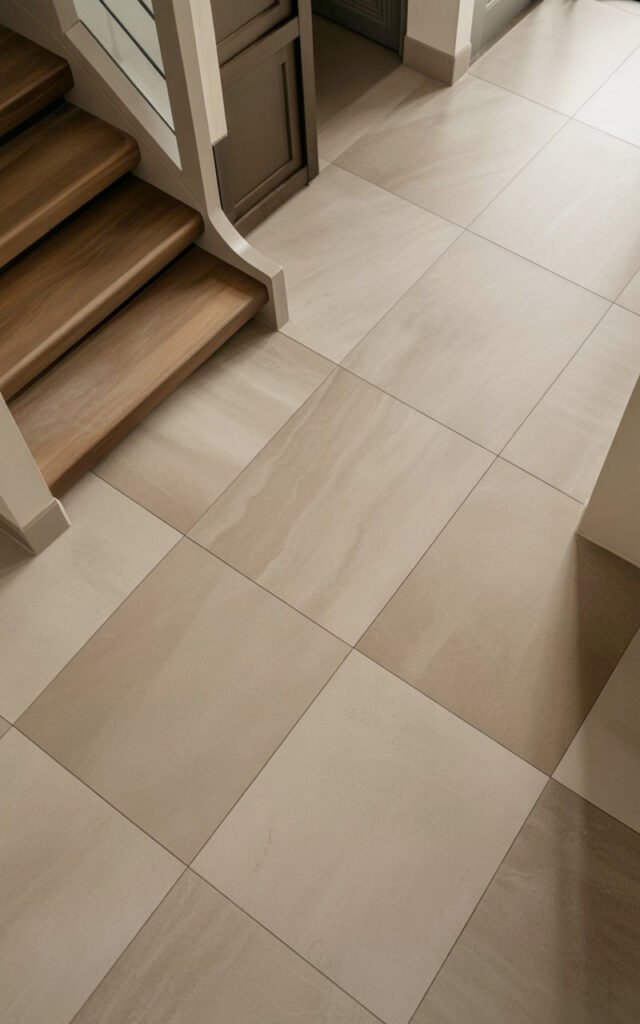
Flooring: The Foundation of Luxury
The large-format tile in the inspiration image is no accident—flooring is critical to luxury design.
Best Flooring for Luxury Entryways
Large-format tile or porcelain:
- 24×24 inches or larger
- Fewer grout lines = more sophisticated
- Neutral tones: cream, beige, warm gray
- Matte or honed finish (not shiny)
Natural stone:
- Marble, travertine, limestone
- Ultimate luxury material
- Requires maintenance
- Expensive but stunning
Luxury vinyl plank (LVP):
- Looks like wood or stone
- Much more affordable
- Waterproof and durable
- Wide planks (7-9 inches)
Engineered hardwood:
- Light to medium tones
- Wide planks (5-7 inches)
- Warm and classic
- Needs maintenance
Polished concrete:
- Modern, industrial luxury
- Requires sealing
- Can add radiant heat underneath
- Very contemporary
What Makes Flooring Look Expensive
Large scale: Bigger tiles/planks = more luxurious Minimal grout lines: Creates seamless look Neutral colors: Warm beiges, creams, natural wood tones Quality installation: Perfect, level, no lippage Proper transitions: Between rooms and materials
The inspo appears to have large-format neutral tile (maybe 24×48 or similar) with minimal grout lines—exactly right for luxury design.
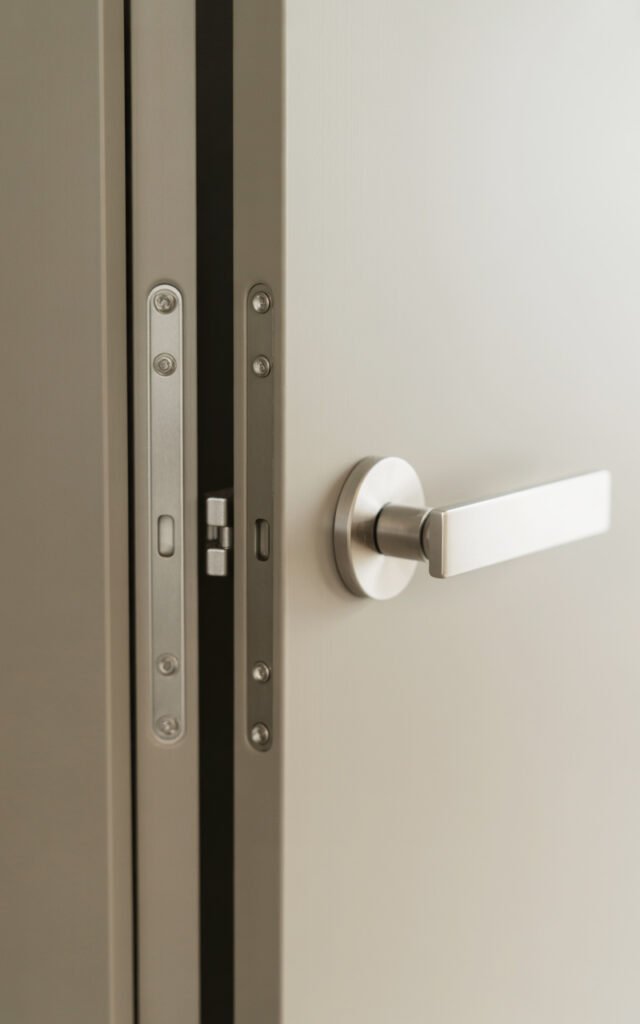
Hardware and Fixtures: The Details Matter
In luxury design, every detail counts. The hidden door hardware, the subtle hardware on the console—these small choices elevate everything.
Choosing Hardware
Door hardware:
- Integrated/concealed (like the inspo)
- Or high-quality lever sets
- Matte black, brass, or bronze
- Substantial feel, not lightweight
Cabinet hardware:
- Handleless/integrated (like the inspo)
- Or simple pulls in matching finish
- Consistent throughout space
Light switch and outlet plates:
- Match your metal finish
- Screwless plates
- Yes, people notice these
Finishes that read luxury:
- Matte black
- Unlacquered brass (ages beautifully)
- Brushed bronze
- Brushed nickel (more budget-friendly)
Avoid:
- Shiny chrome (reads commercial)
- Cheap gold tone
- Mismatched finishes
- Plastic anything
Creating the Look on a Budget
The inspiration image probably cost $2,000-4,000 to create. Here’s how to get 80% of the look for 40% of the price.
Budget Breakdown: Luxury Entryway ($1,200)
Statement mirror with DIY backlighting: $300
- Wavy edge mirror custom cut
- LED strips and mounting
Floating console (IKEA Besta hack): $250
- Two cabinets wall-mounted
- Paint or wood veneer
Pouf: $150
- Bouclé or textured neutral
Table lamp: $80
- Simple sculptural lamp
Natural elements: $50
- Foraged driftwood + vase/planter
Styling accessories: $80
- Books, small objects, dried botanicals
Paint: $60
- Warm neutral for walls
Hardware upgrades: $80
- Door hardware, switch plates
Area rug (if needed): $150
- Natural fiber or neutral
Total: ~$1,200
Where to Splurge
- The mirror: This is your statement piece
- Lighting: Good lighting makes everything look better
- Paint quality: Better coverage, better finish
Where to Save
- Console: IKEA hack vs. custom
- Accessories: Thrift, DIY, forage
- Natural elements: Find them yourself
- Pouf: Affordable options exist that look expensive
Styling Mistakes to Avoid
These errors kill the luxury vibe instantly:
Mistake #1: Too Much Stuff
Luxury needs breathing room. One statement mirror + console + pouf is enough. Adding more furniture or decor clutters and cheapens.
Mistake #2: Wrong Scale
Tiny mirror on big wall, or oversized furniture in small space both look wrong. Scale matters enormously.
Mistake #3: Overhead Lighting Only
One ceiling fixture without layered lighting feels flat and unluxurious. Add accent and task lighting.
Mistake #4: Matchy-Matchy
Everything from the same store looking too coordinated reads staged, not luxury collected.
Mistake #5: Wrong Color Temperature
Cool white bulbs make even expensive spaces feel cheap. Always warm white.
Mistake #6: Skipping Quality Hardware
Cheap door hardware and light switches undermine your design. Upgrade these.
Mistake #7: No Natural Elements
All-manmade materials feel cold. Add wood, stone, plants, or natural fibers.
Maintenance and Care
Keeping your luxury entryway looking fresh:
Daily
- Quick surface wipe on console
- Straighten any items
- Ensure mirror is clean
Weekly
- Dust all surfaces and objects
- Clean mirror thoroughly
- Vacuum or mop floor
- Fluff pouf if needed
Monthly
- Deep clean mirror and lighting
- Check LED strips still adhered
- Refresh dried botanicals if fading
- Touch up wall paint if scuffed
Adapting for Different Home Styles
The inspiration image is modern/contemporary, but these principles adapt:
For Traditional Homes
- Ornate mirror frame instead of modern
- Classic console with legs vs. floating
- Brass hardware and warm metallics
- Maybe a small chandelier overhead
For Minimalist Modern
- Even simpler mirror shape
- All white or monochrome palette
- Less styling on console
- Clean lines throughout
For Transitional
- Mix modern and traditional elements
- Softer lines on furniture
- Warm metals and woods
- Balance between ornate and simple
The fundamental principles (statement mirror, floating or minimal furniture, luxury lighting, neutral palette, natural elements) work across styles with appropriate adjustments.

Final Thoughts: Your Luxury Entrance Awaits
Creating a luxury entryway isn’t about spending a fortune—it’s about understanding what makes spaces feel elevated and executing those principles well. A backlit statement mirror, floating console styled minimally, warm layered lighting, quality materials, and organic natural elements create that luxury hotel feeling.
The inspiration image shows it perfectly: a few high-impact pieces, excellent lighting, cohesive neutral palette, strategic styling, and attention to detail. Nothing in that image is cluttered, cheap-looking, or unnecessary. Every element serves both form and function.
Start with your focal point—probably the mirror. That alone will transform your space. Layer in the other elements over time: better lighting, quality hardware, a console or shelf, natural elements, careful styling.
I transformed my basic builder-grade entryway into something that makes me smile every time I walk through the door for about $900 total, spread over three months. The single biggest impact? That backlit wavy mirror I found fabricated locally. Everything else supported and enhanced that statement piece.
Your entryway is the first impression of your entire home. Make it count. Make it feel special. Make it feel like every time you come home is an arrival somewhere wonderful—because it is. 🙂